Here’s some of what we did to run the fully interactive online Tech Exeter / Digital Exeter conference with live remote guests, live presenters and real-time interaction.
Updated: This post, originally from 2020, has new photos from 2021.
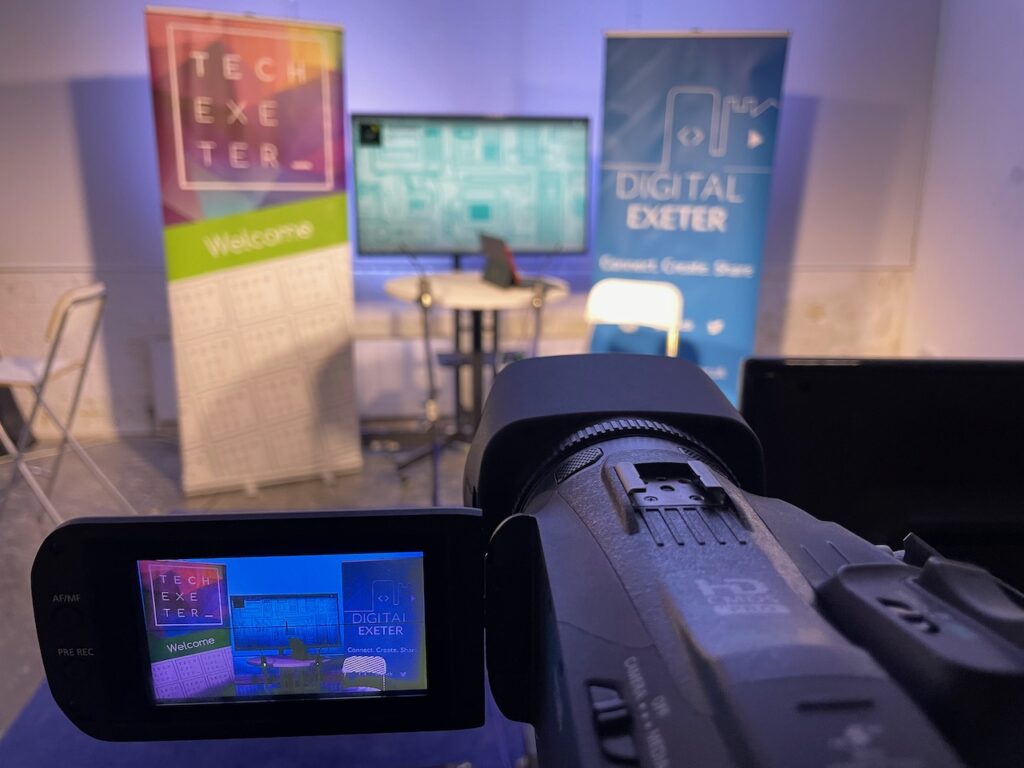
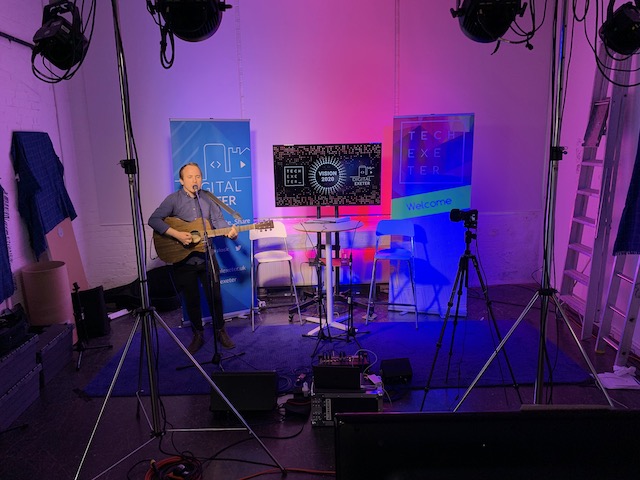
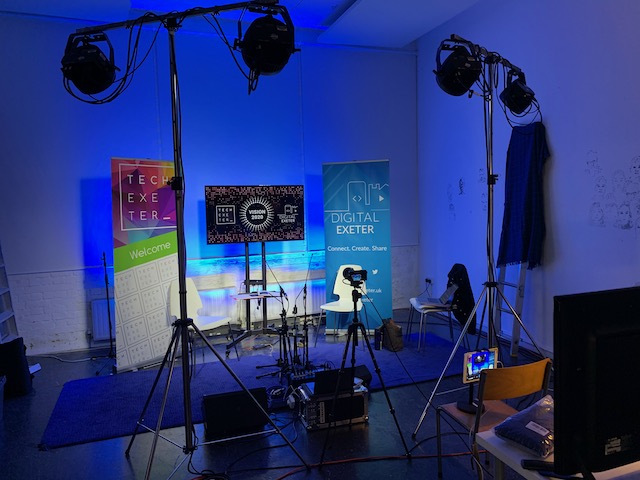
Pictures paint a thousand words, and videos do a million, so take three minutes to get a studio tour with Shane from Digital Taunton:
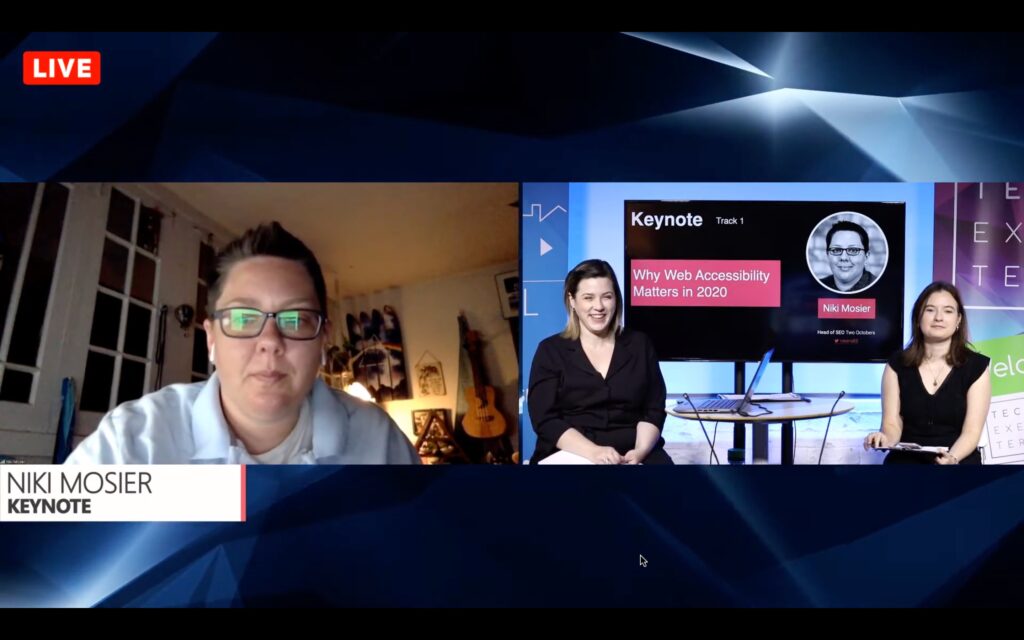
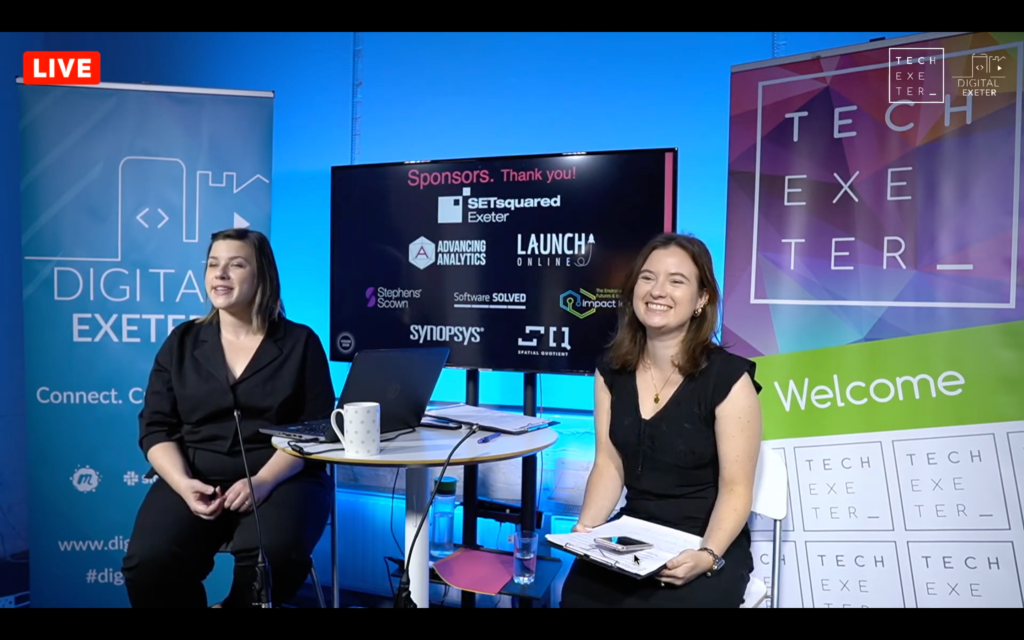
First, some introduction. I’m the sound and lighting man, the first one to be introduced by Shane in the video. Kris Sum of Tech Exeter did overall technical co-ordination and was producer and lead on the video side. I provided all the sound and lighting equipment, and a bit of the video equipment as well. We had live presenters in our studio, but all our conference speakers were remote guests via Zoom.
The master video distribution in this case was Hopin. This is what the delegates registered themselves with, and it distributed our final broadcast feed to provide the ‘main stage’. We had another track that was managed entirely inside Hopin, which is much more like a traditional video meeting. Hopin’s feature set changes quickly, so I’m not going into detail, but it allows virtual sponsor booths, speed networking and other things to round off the conference experience. There are alternatives out there.
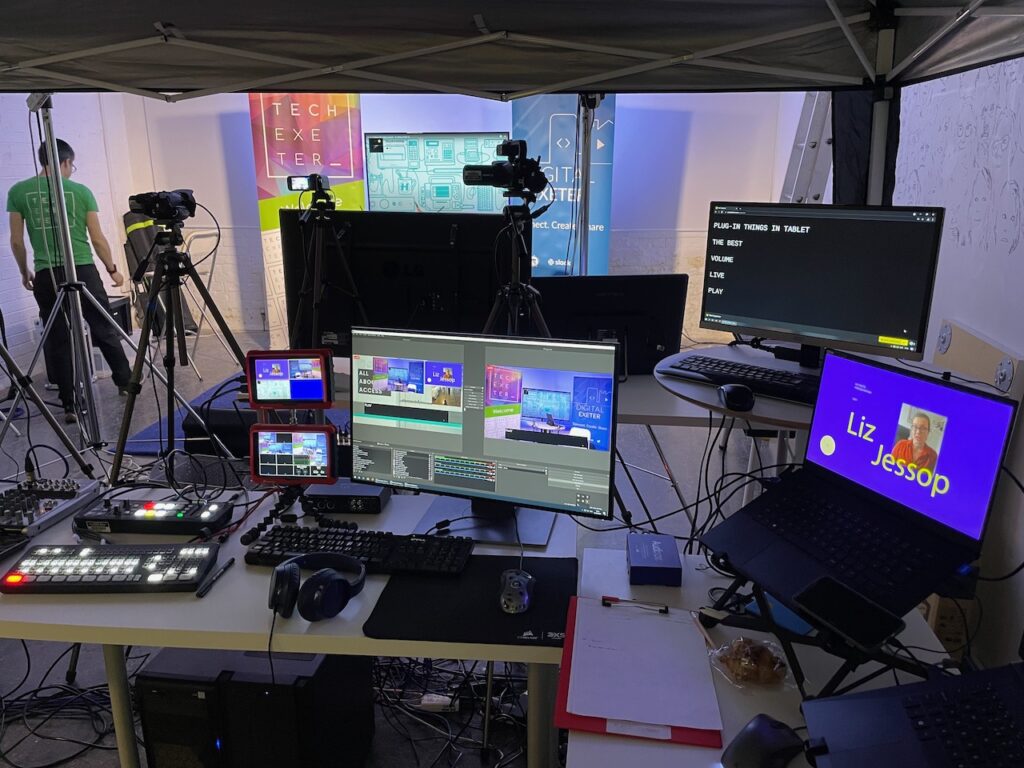
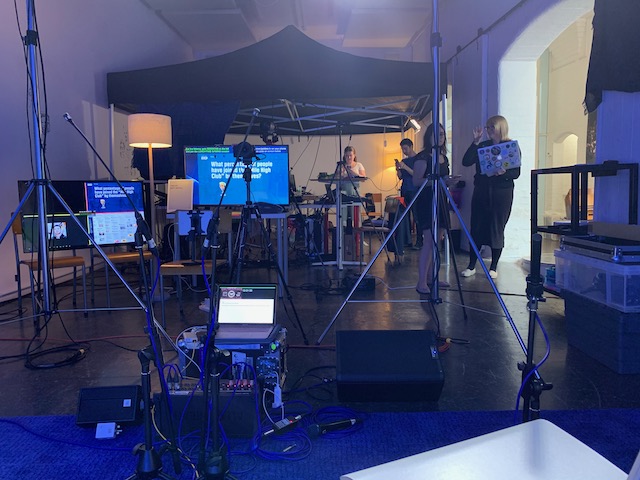
The video production system was run by multiple machines with distinct roles. Whilst this means more equipment, separate machines are easier to understand and work with under pressure. It’s also easier to physically spread your human team out this way.
Table of contents
OBS
The master video mixer is OBS. It’s free. It’s powerful. It runs on Windows, MacOS or Linux. Other people already go into detail on setting it up, so I won’t. It covers these tasks:
- Mixing between video sources
- Generating nice transitions between sources
- Using ‘scenes’ built in advance to simplify live use
- Titling overlays
- Background graphics
- Multiple sources on screen
- Preview sources before going live
The final feed gets to Hopin from OBS using RTMP.
Sub-mixing and encoding the video
There are lots of ways to get your video sources into OBS. Most of our gear wasn’t top-end professional, so it used HDMI. To convert HDMI signals to a video stream that OBS could understand, we used two Magewell USB HDMI encoders (about £300 ea).
Each Magewell encoder was fed from the output of a Roland V-1HD HDMI video mixer (about £1k) as Kris and I both had one. We fed up to four live video cameras into one V-1HD mixer, and our remote presenters and recorded content into the other. The V-1HD generates a nice multi-view preview output, as well.
(For simpler streaming jobs, a single V-1HD is enough on its own. Much video streaming software, such as Microsoft Teams, Zoom, YouTube, Facebook Live etc. will recognise the Magewell-encoded feed as if it was a webcam, and you can go from there.)
A dedicated machine provided an output of recorded presentations, sponsor reels, etc. I can’t remember what replay software was used, but you need something that produces a clean output without clocks, progress bars, mouse pointers and so on. One option is to use QLab (Mac only). It has a free version, plus a trial mode for testing the full version, then you can rent the full video functions for $4 per day.

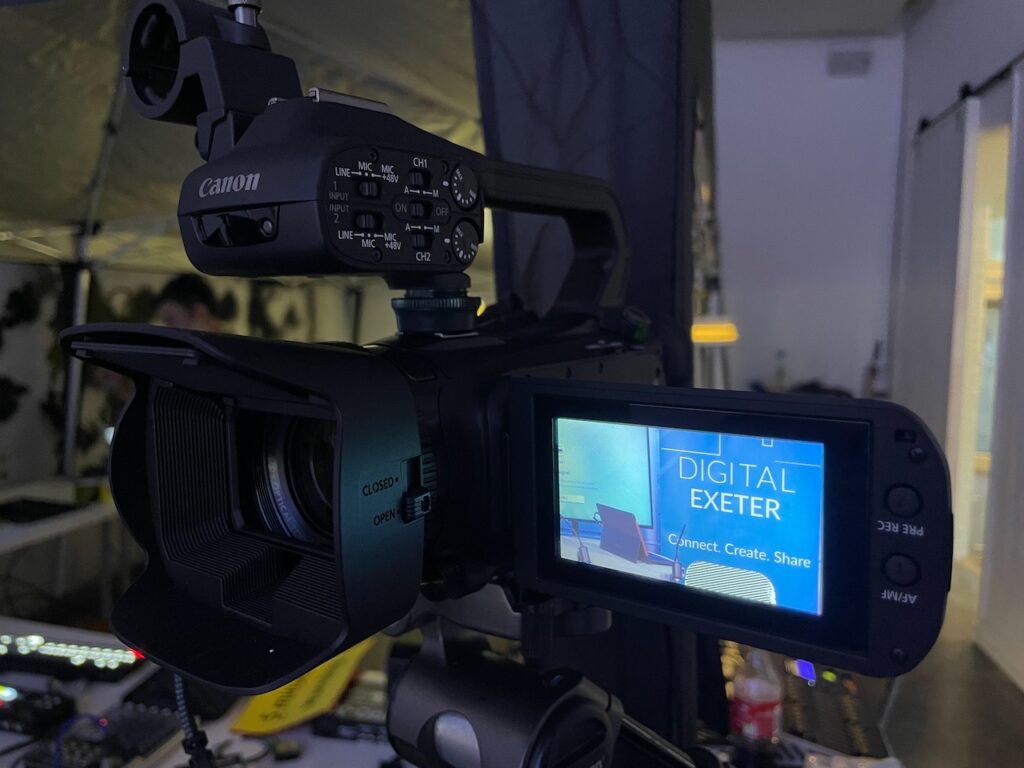
Cameras
We used all sorts. The primary was a Canon mirrorless camera with a 70-200mm f/2.8 lens. We also used domestic camcorders and a GoPro. All could give ‘clean’ HDMI out, i.e. a picture with no text or overlays. Better cameras have a better dynamic range, so they’ll cope well with brightness differences across the scene.
Sturdy tripods help. Make sure the cameras can run all day.
It’s useful to have secondary camera angles which are close-crop head-and-shoulders shots, and maybe a wide or side-angle shot for added interest.
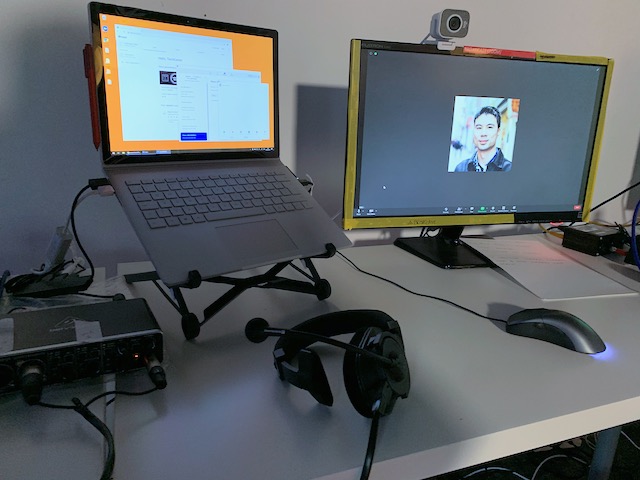
Looping in Zoom calls
We had two machines which could each run a Zoom meeting. They had two screens. Other conferencing software would also do, but Zoom is reliable and seems less confusing to users. Zoom also makes it easy to put the video display full-screen on one of the monitors.
On the Zoom and recorded video machines, we put HDMI splitters on one of the screen outputs. These fed a monitor (for normal use) and the split output copied this picture to the Roland video mixer. By putting the Zoom caller (or their screen share) full-screen on this monitor, we could simultaneously capture it into the video mixer. In OBS, a preset was configured to crop out the Zoom controls that we couldn’t otherwise hide.
Each Zoom machine had a webcam on it, which was used when the remote presenters first connected at their time slot. A ‘Zoom host’ welcomed the remote presenter, then briefed them that they were about to be switched to broadcast settings. For video, this meant switching the remote presenter away from the local webcam and onto a feed from an auxiliary camera pointed at the studio presenters. This gave the remote presenter an ‘audience’ in the studio and was helpful when the remote presenters would be answering live questions posed by the studio presenters.
In our case, NDI HX Camera and NDI Tools was used to feed an iPad camera view of the studio presenters to the remote presenters on the Zoom machines.

Resolution and Frame Rates
We ran all our cameras, video mixing and monitors at 1920×1080 (‘full HD’). I think everything also ran at 60fps. The Roland video mixers won’t mix varied resolutions or frame rates. Note that it you have a TV in shot of a camera, you can get flickering if one is 50fps and other is 60fps.
HDMI splitters can pass signals differently depending on the order in which their connected devices are attached or powered up. This means you can run tests that work, then things can subsequently go awry on next use until your video devices are disconnected and reconnected in the correct sequence.
The Studio Presenters’ TV Graphics
A dedicated laptop running PowerPoint or Keynote was situated near the studio presenters. It drove the slides on the TV in shot next to them. Another HDMI splitter sent a duplicate of the TV picture feed back to the video mixers, so these slides could be shown full-screen to the external audience.
PowerPoint and Keynote were remote-controlled by phone apps or more traditional USB clickers. (We didn’t use it this time, but I have a pro-grade presentation clicker with multiple wired and wireless remotes. This is often beneficial when you have multiple presenters and partially improvised content.)
What the Studio Presenters See
Note that PowerPoint/Keynote presenter view isn’t easy to see in a TV-like presenting scenario, so if slide notes are used they either need to be printed, or a big TV/monitor used for presenter view.
We didn’t use a teleprompter, but you can buy camera housings that use a tablet computer to make a decent one. For giving out information silently, we had a shared Google document set with huge text. Any tablet, laptop or e-ink device with Google docs support could show or edit this information. It’s nice to have a live summary of guest names, job title and talk titles, up-to-date to the current moment.
Our presenters had a large TV showing the broadcast output video. This way, they knew when they were live and what our audience could see. This TV was directly below the main camera. We also had a large TV off to the side showing a duplicate of the multi-view from one of the Roland V-1HD video mixers, so they could see and interact with the remote presenters before they were live.
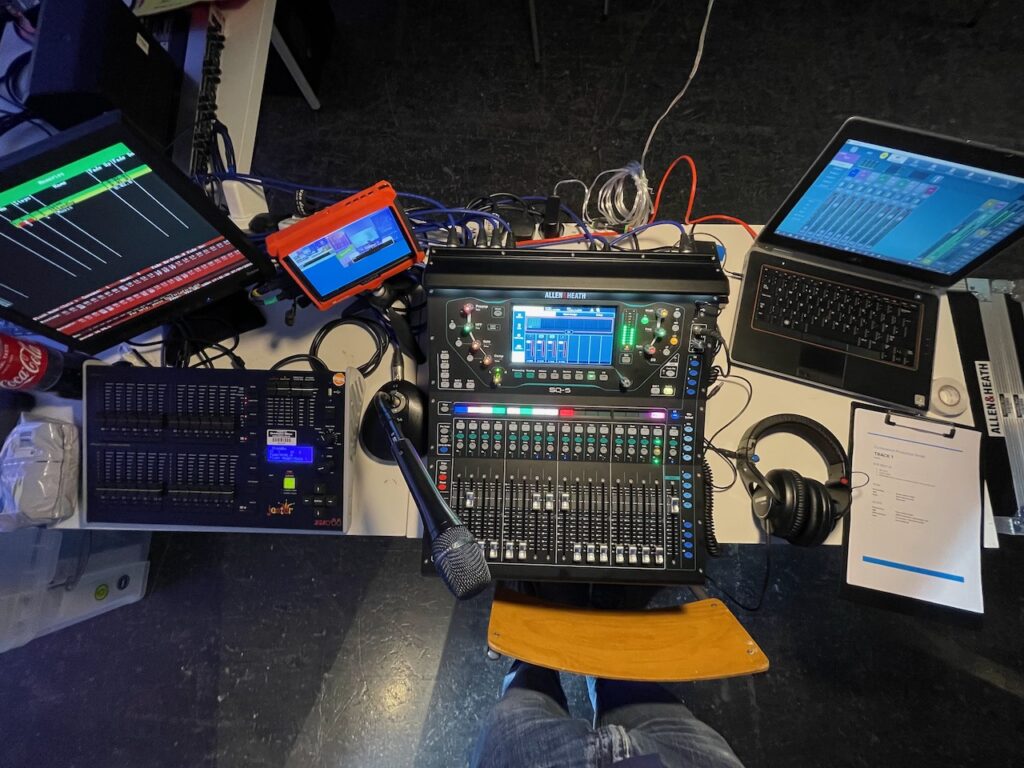
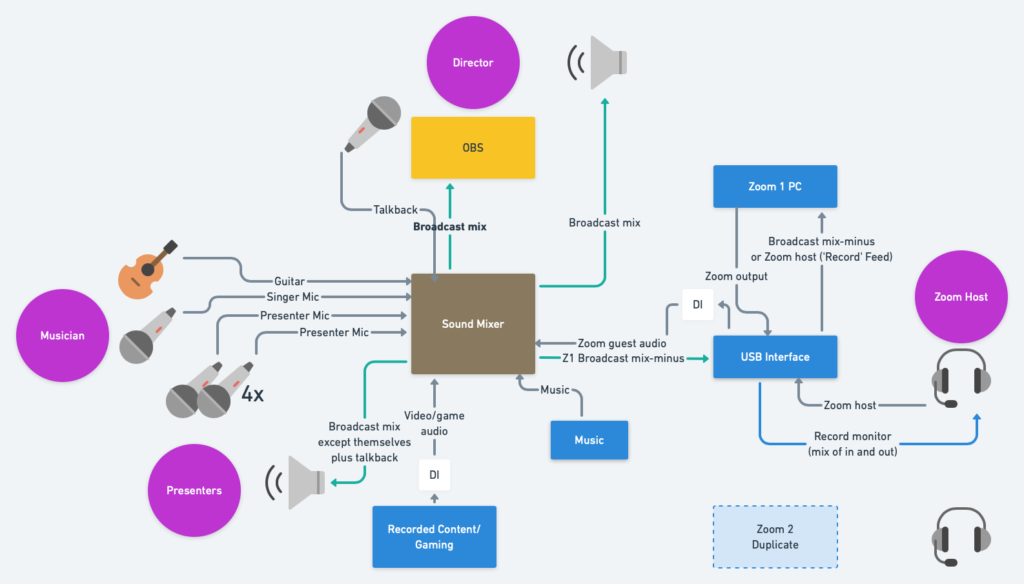
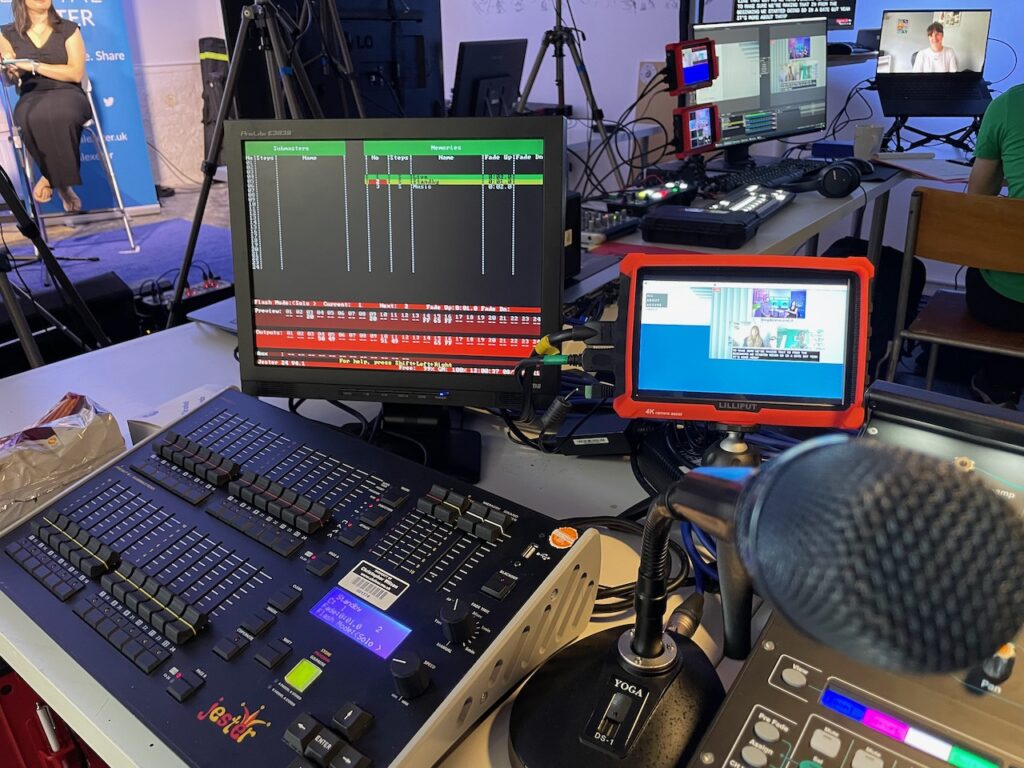
Sound Mixing
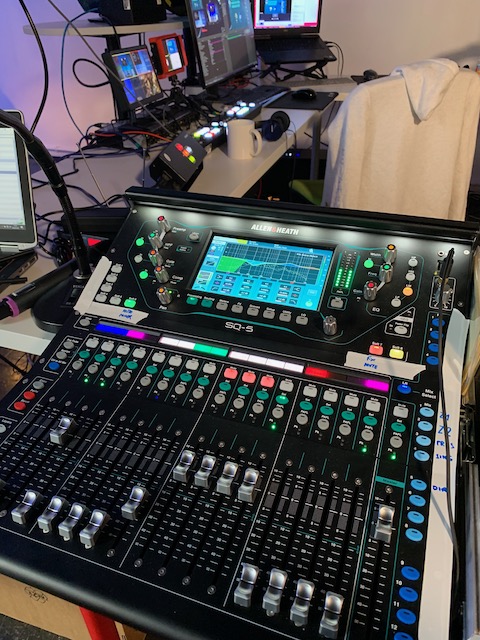
All sound was mixed on an Allen & Heath SQ-5 digital mixer. A much simpler mixer would have done fine, and most digital mixers have the advantages of really good routing, compression at multiple points, and good metering.
The inputs were:
- Studio presenter mics
- Feeds from the Zoom machines
- Audio from the video playback machine (via an ARX Audibox USB DI)
- A radio mic for studio tours
- Royalty-free background music played from a laptop
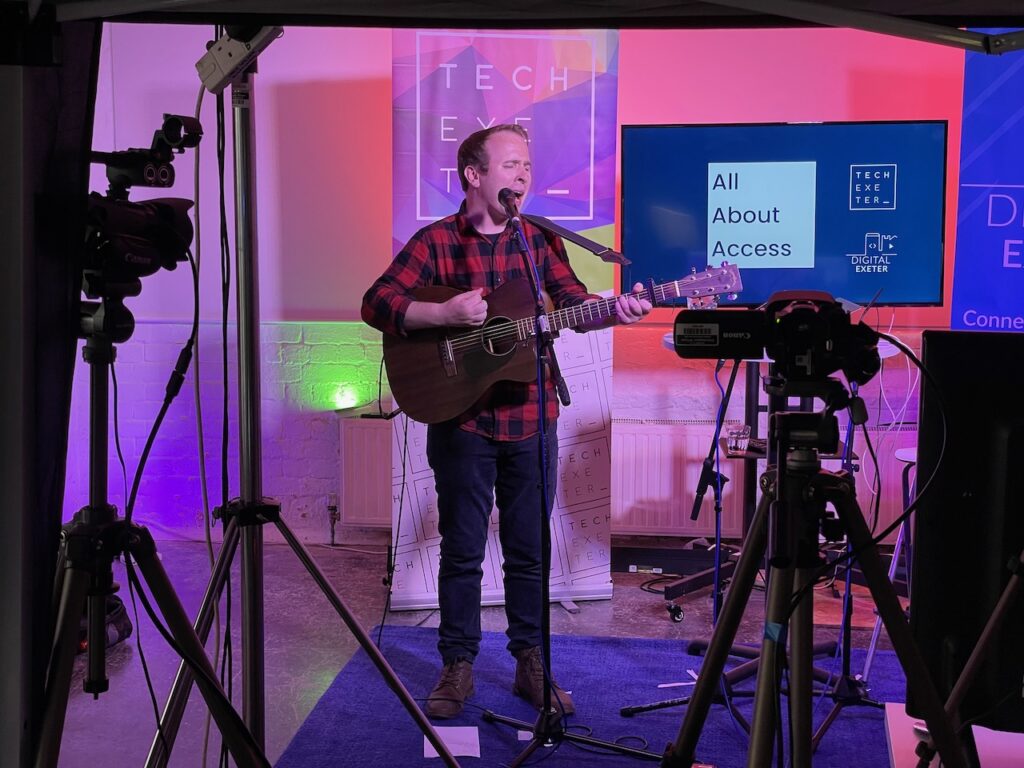
- A mic and guitar input for a live musician
All sources had moderate compression on them and the the master bus had a limiter as final protection. The goal was an easy listen for the audience, even on laptop speakers.
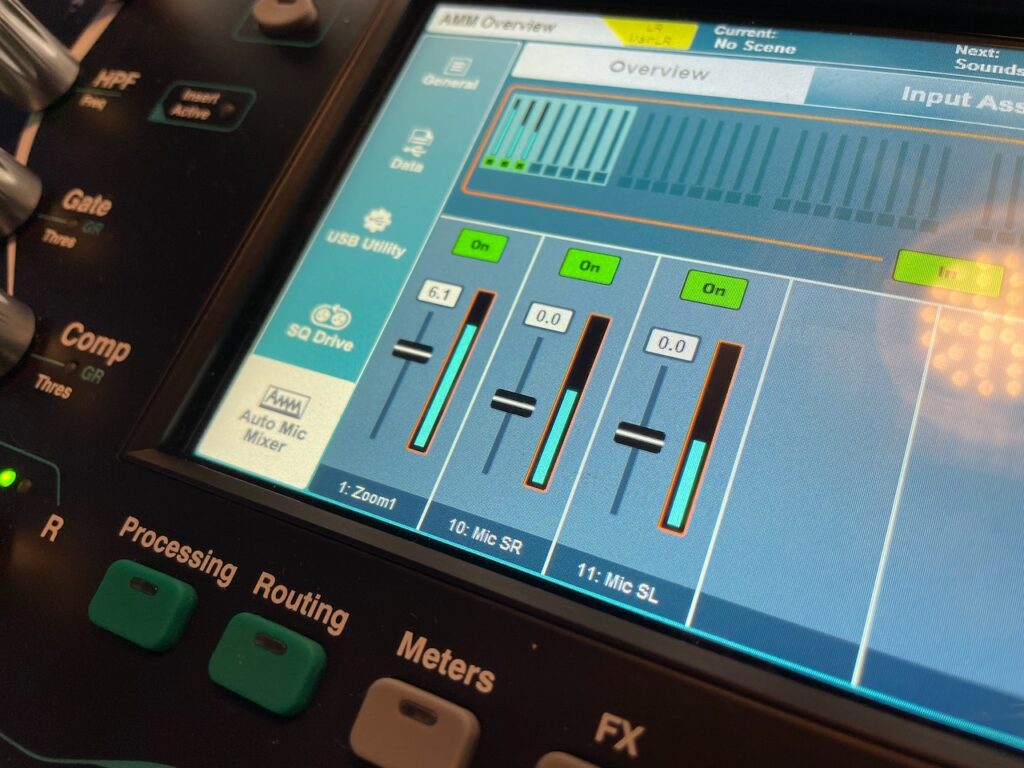
The SQ-5 has a good automixer. By assigning this across the studio mics and the Zoom inputs, the reverb in the studio was reduced and there’s also a bit less chance of audio loopback on the Zoom call.
A copy of the final sound mix was fed into OBS, which relayed it unprocessed. Not unusually, the OBS computer’s internal sound card was noisy unless the feed went via an isolating transformer.
Another copy of the final mix went to a headphone distribution amp on Kris’s video table, which fed his headphones and a small monitor speaker. Always keep an ear on the output.

Sound for the Stage
The studio presenters had a floor monitor speaker which had a copy of the broadcast feed (post-fader) with everything except their own mics and the musician. A talkback mic at the sound desk was also piped in.
The musician had his own floor monitor which was more powerful and it carried his singing mic and guitar at a level independent of the broadcast mix (pre-fader). This was sound-checked during a recorded segment.
To avoid physical fitting of mics to the studio presenters, and to keep a low profile on camera, I used Beyerdynamic GM304 mics. They were probably around 50cm from the people speaking.
Sound for Zoom
Whenever a remote caller is connected into a studio broadcast, they need a return feed of the broadcast mix except themselves. Otherwise, you get feedback. It’s called a ‘clean feed’, and usually generated with an aux bus. So, Zoom machines 1 and 2 each had a post-fader copy of the broadcast mix that just excluded their own machine.
Each time a new remote presenter connected to Zoom, the Zoom host would temporarily turn on their headset mic, brief the remote presenter, then turn down their headset mic and replace it with the clean feed signal from my sound desk. From this point, the remote presenter will hear (and can respond to) all recorded content or studio presenter speech being broadcast.
In the end I used a Behringer UMC204HD recording interface (about £80) which I thought would do nearly all my audio handling for a Zoom machine. I just had to attach a DI box to one of the direct audio outputs to get my Zoom feed to the main mixer. There are monitoring controls to allow the Zoom host’s headphones to hear Zoom (audio out) mixed the feeds they were sending to it (audio in). The interface has two inputs, the first of which was used for the Zoom host’s headset mic and the second for the clean feed from my desk.
The problem we discovered was that these inputs could not be turned right down to zero, so we did some physical unplugging when we flipped the Zoom guest in or out of broadcast settings. I suspect a Native Instruments Komplete Audio 2 would not have this limitation. Alternative ways to handle the audio include just selecting different sources in Zoom. There are precious few simple USB audio input devices on the market. The Behringer UCA202 or UCA222 are cheap and usable and can be wired into a small utility mixer if needed. (In 2021, I just used an Allen & Heath ZED 10 mixer instead.)
Our studio presenters were hearing the remote presenters through their studio floor monitor speaker and speaking back via quite distant studio mics. Impressively, even when the remote presenters were also just using their laptop mic and speakers, there were no problems with echo or with each side hearing the other. This is a testament to the cleverness of the audio processing in Zoom. However, I’d paid proper attention to routing, levels and processing to do my bit to help.
Going Live
Audio is normally slightly ahead of video. You can spot this on live TV all the time – sound will normally come live before the picture, and is the earlier of the two to start to fade out. I called out ‘mics going live’ on talkback. Still, always brief everyone never to say anything inappropriate – ever – whilst on set. Accidents happen.
Lighting
The goals for lighting were:
- To look suitably even from the camera positions
- To come from a high enough angle (perhaps 45 degrees) to look natural
- To be brightness-balanced with the TV
- To have a colour temperature to match the TV and give the presenters a natural skin tone. (The camera white balance has to be set accordingly, too.)
Backdrop lighting goals were:
- To complement the colours of the set
- To raise the background to a brightness that was even with the foreground
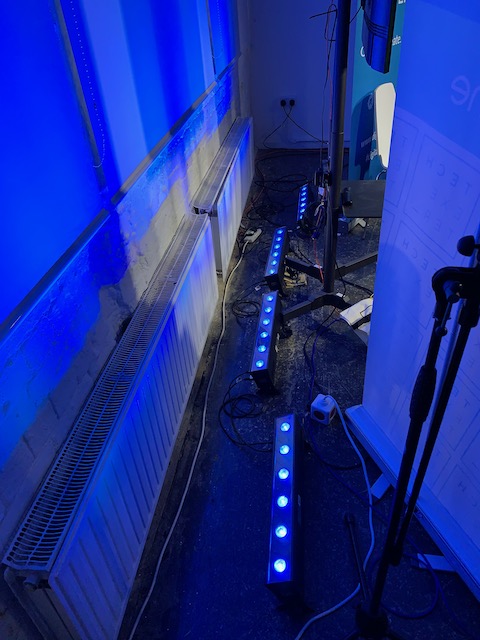
We used LED light fixtures designed for stage work. Low-end videographer lights might not have lit the area brightly enough given the size of our set.
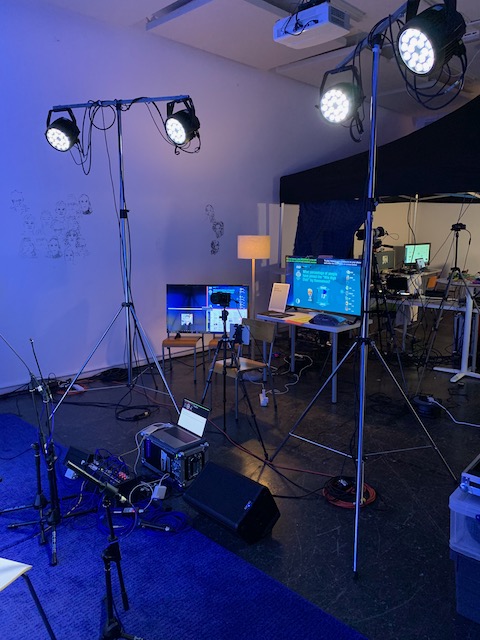
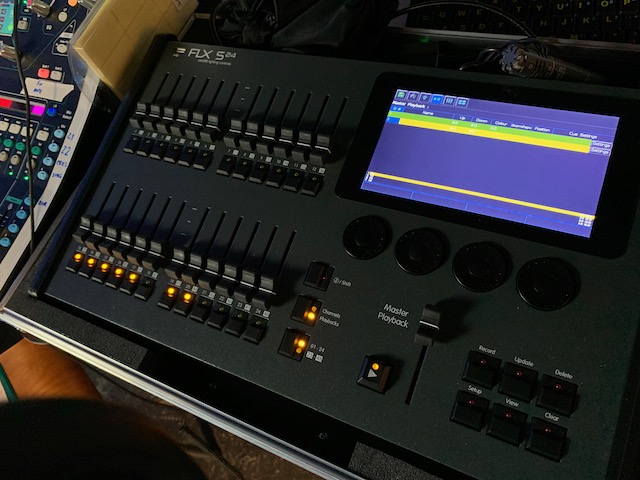
The lights were controlled by a Zero 88 FLX S24.
Preparation Considerations
Depending on your ambitions, if you’re doing this for the first time, I would draw out your signal flow diagram (we sketched in whimsical.com). If it’s complex, draw audio separate from video. Based on the diagram, you can assemble a kit list. You may need more adapters and cables than you thought. It’s a good idea to build a test rig ahead of timer to prove your design can be built and that it works. Long HDMI leads (10m+) are prone to quirky behaviour.
Think about video content and scenes you’ll need from beginning to end. Have pre-roll, standby, titling and post-show content ready-built.
Make sure you have the rights to broadcast all your content. Royalty-free music is easy enough to source. Your guest presenters may keep the copyright in their presentation.
Make a detailed running order with time running down the page and have a column for each role, with what they’re doing. Roles might be video mixer, audio mixer, presenters, Zoom host, social media manager, etc. Think about when rest periods occur.
Think about what the experience is going to be like for your guest presenters. Allow them to rehearse the technology before the day. Get any of their recorded content as early as you can, and check it. Have a means for them to communicate with you on the day.
Decide what you’ll do if things go wrong. Internet failure, remote guest internet failure, no-shows, technology glitches etc.
Rehearse introductions and links with your presenters. They should know when to start speaking, and you should know when to bring in the next item.
Having two presenters makes it easier when live questions and comments need checking during live segments. Share your social media handles and promote a unique hash tag.
Build Considerations
You’ll probably need quite a few power leads, and some gaffer tape for safety.
Think about a suitable ‘set’ for your studio presenters. High stools can work well. If there are no chairs, mark the floor with a spot to stand on. Test your camera positions.
If your room has a lot of reverb, bring in rugs and soft furnishings to damp it down. Use quiet chairs. Isolate the Zoom host’s chatter from the studio presenters.
Remember, you might have behind-the-scenes cameras, especially if your conference is technical.
Have prominent clocks and timers so everyone can keep track. Have a computer streaming the conference like a delegate would, so you spot any gremlins no later than they do!
It took a day to build and test our conference studio. There wasn’t enough time to make it perfectly tidy as well!